
Hello there peasants, Future Overload WoodReviewer here and I have some great news: ROBLOX has decided to restart their effort to get people to submit more endorsed models on the Dev forum. For those who don’t know what endorsed models are, read one of the previous posts because this intro has a new joke. Now, I don’t know if they decided to relaunch this because of me, but I am more than willing to take credit for it for the sake of man kind. More importantly, I was made Supreme Wood Grain Model Reviewer by UristMcSparks.
Now, no specific title was given then, nor if I actually had any power, but no one has told me otherwise so far so I’m going assume that is what they meant.
Moving onto the actual meat of this post, today it is time to look some more endorsed models, today focusing specifically on models that use CSG. If you haven’t already, please read my blog post from last Friday where I talk about wood grain and CSG. If you have, congrats, you are now ready to look at examples. This is the first example, a simple bench with unioned wooded planks by Carollicious .

As you can see, the wood grain was wrong. Now, I could have used the negation trick to fix this in a few seconds, but I decided to do it the proper way. First I separated the union, which yielded two unions, one for the back, one for the seat. I then separated the one for the seat, and it gave me parts instead of unions. I then fixed the bottom parts and unioned it together.

And then unioned the new seat union to the back union, selecting the seat first so the back would have correct wood grain. It was an easy first model, with the result here.

Next up we have this chair by DataSyncronized.

And like all chairs, it has bad wood grain on it’s legs.
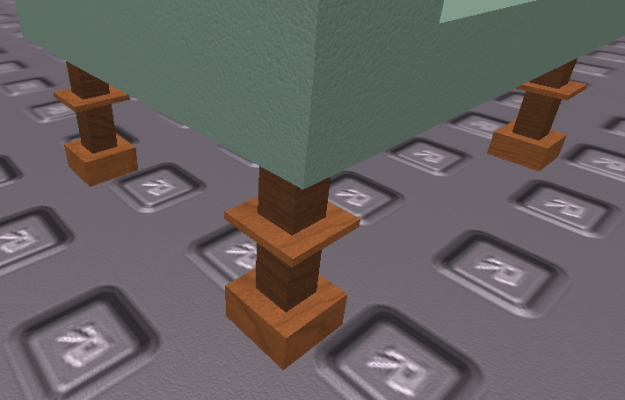
This was a simple fix; I just separated the unions, made sure the main support was correct, and reunioned them making sure I selected the dark brown piece first.

This still looks weird, but that is because of the fact the lighter brown parts seem out of place, like something out of The Jetsons. They have no structural reason for existing, and they will always be weak. IMO they should be removed, but keeping with the fact I want to keep the models as close to the original as possible I kept them in. Here was the final result.
Next up was this bird house by Nathan_Lua. This is where the unions get slightly more difficult to fix.

There are three main issues here:
- The roof is awkward
- The main body of the house should be going vertical, not horizontal
- The legs and main supports are wrong
Lets start with the roof. I separated the union and off-set the new pieces by .001 studs to prevent texture clipping. Next lets look at the legs.

For the vertical support, it was an easy fix: just separated the union and kept the original part. Next it was the legs. Before I describe what I did, I need to talk about the cylinder mesh; for some reason, it rotates the the wood texture by 90 degrees, so if the wood is correct and you add it, the wood with the mesh will be incorrect. If you then union it, the wood will be correct because the union decides texture based on the brick, not mesh, hence why the vertical support was wrong. The first thing I did was to separate the unions, which lead to this:

Each leg had a negated part under it so it would be flat on the ground. I then cloned each leg, deleted the mesh, fixed the wood grain, negated the new leg(the square brick you see in the picture, and reunioned the new leg negation, original leg, and the bottom negation selecting the new leg negation first for the correct wood grain.

Last up, the main house. This involved some trickery. You see, unions can be smaller than the smallest parts on ROBLOX, so if you want to resize/rotate them, they will get too big. To solve this, I first enlarged the body of the bird house to about 10x10x10 studs. I then separated it, and fixed the wood grain one one side, seen below.

I then re-unioned it making sure to select the correct wood grain side first. I then resized it down, and unioned it with the wedges on top of it from the original bird house, again, selecting the proper wood grain first for the union. And here is the finished product.

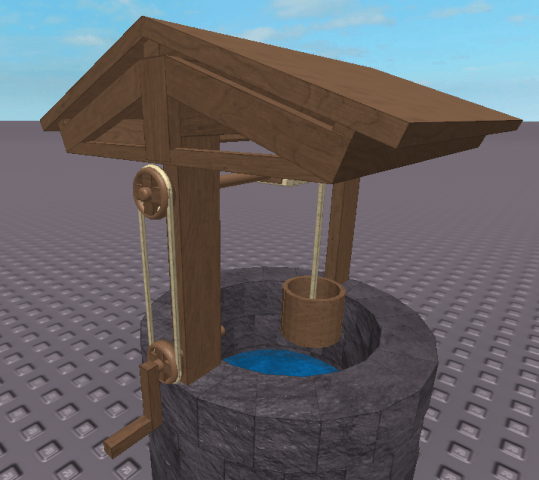
Last up we have this water well by RBXKyle.

There are several issues with this; the roof, main support, bucket, and handle all have bad wood grain on them.


And this rope was odd, but more on that later.

First off, the roof, handle, and supports were simple texture flips.
Next up was the rope. You see, the texture on a rope should be the same on all sides. Normally, I ignore this, but since it was made out of wood grain I was obliged to fix it.

Now all the rope goes across, instead of some going across and some going vertical. Now on this, I couldn’t fix all of it because of the bricks, but it was better. Then there was the rope connected to the handle. This was a mesh that was scaled down, so after I rotated it it looked odd.

All I need to do with switch the size of the mesh and it was fixed. Last up, the bucket. Like the bird house, the first step was super-sizing it so I could properly work with the bricks.
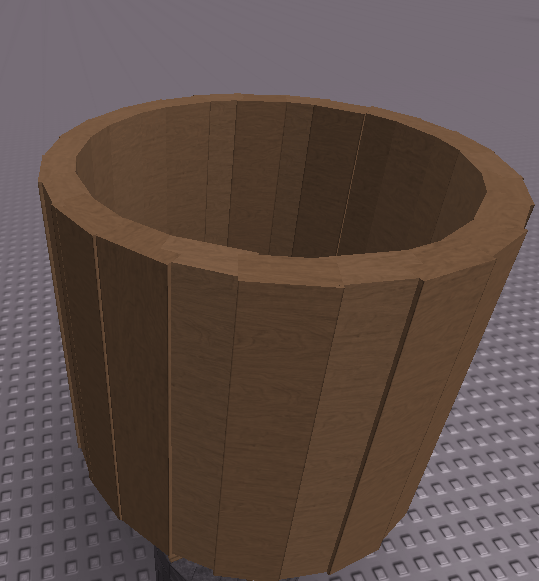
Then I rotated one brick on the side, selected it first, selected the rest of the bricks, reunioned it, downsized it, moved it back, and it was done. Model Here.

Well, mostly done. Some of you may remember my monkey slave, Chris, that makes all my CSG models. I also have 31 other monkeys to do other things, such as cook, clean, and script. You see, when I changed how the wood grain on the bucked looks, I changed the unions rotation, and as a result the script that moves the bucket up/down broke. Luckily, my scripting monkey Chelsea fixed it. I’m not sure what exactly she did, but she changed the two lines below and it was fixed.
bucket:SetPrimaryPartCFrame(bucket.PrimaryPart.CFrame * CFrame.new(0,-0.02,0))
bucket:SetPrimaryPartCFrame(bucket.PrimaryPart.CFrame * CFrame.new(-.02,0,0))
bucket:SetPrimaryPartCFrame(bucket.PrimaryPart.CFrame * CFrame.new(0,0.02,0))
bucket:SetPrimaryPartCFrame(bucket.PrimaryPart.CFrame * CFrame.new(0.02,0,0))

And that solved the issues with CSG. Now, originally this series on endorsed models was suppose to be a four to five part series, and seeing as this is part three, it was going to end. But with my appointment as Supreme Wood Grain Reviewer for ROBLOX, and with endorsed models getting more attention, I will try and do more posts where I review, and fix, new models that want to be endorsed as they are made. But speaking of endorsed models, the next two parts on this series with feature EndorsedModel, the user, and yes the deadline to fix your models was really March 22nd.

This blog is bae
LikeLike
Pingback: Game Maker-Game Development Tycoon | WoodReviewerRBX
Pingback: More Horses-Horse Valley | WoodReviewerRBX
Pingback: Jungle World-Twisted Paintball Part 2 | WoodReviewerRBX
Pingback: Interest-Bank Tycoon | WoodReviewerRBX